Follow Me On Pinterest!
No Bake Smores Cheesecake


No Bake S’mores Cheesecake: A Campfire Classic Reimagined
Introduction
There’s something magical about summer nights spent around a crackling campfire, where the air is filled with laughter and the tantalizing aroma of toasting marshmallows. I can still picture those evenings from my childhood, sitting on a weathered log with friends, chocolate bars melting in our palms as we skewered marshmallows on sticks. The first bite of a freshly made s’more—with the gooey marshmallow, rich chocolate, and crunchy graham cracker melding into one heavenly combination—was nothing short of euphoric. It was a taste of nostalgia, joy, and laughter—moments I cherished deeply.
Fast forward to a chilly autumn evening, when the campfire ambiance was replaced by the comforting warmth of my kitchen. I found myself craving the delightful flavors of s’mores, but I wanted to enjoy them without the hassle of a fire pit. That’s when the idea struck me: why not create a no bake s’mores cheesecake? This delightful dessert encapsulates the essence of those treasured campfire treats while adding a creamy twist that leaves you craving more.
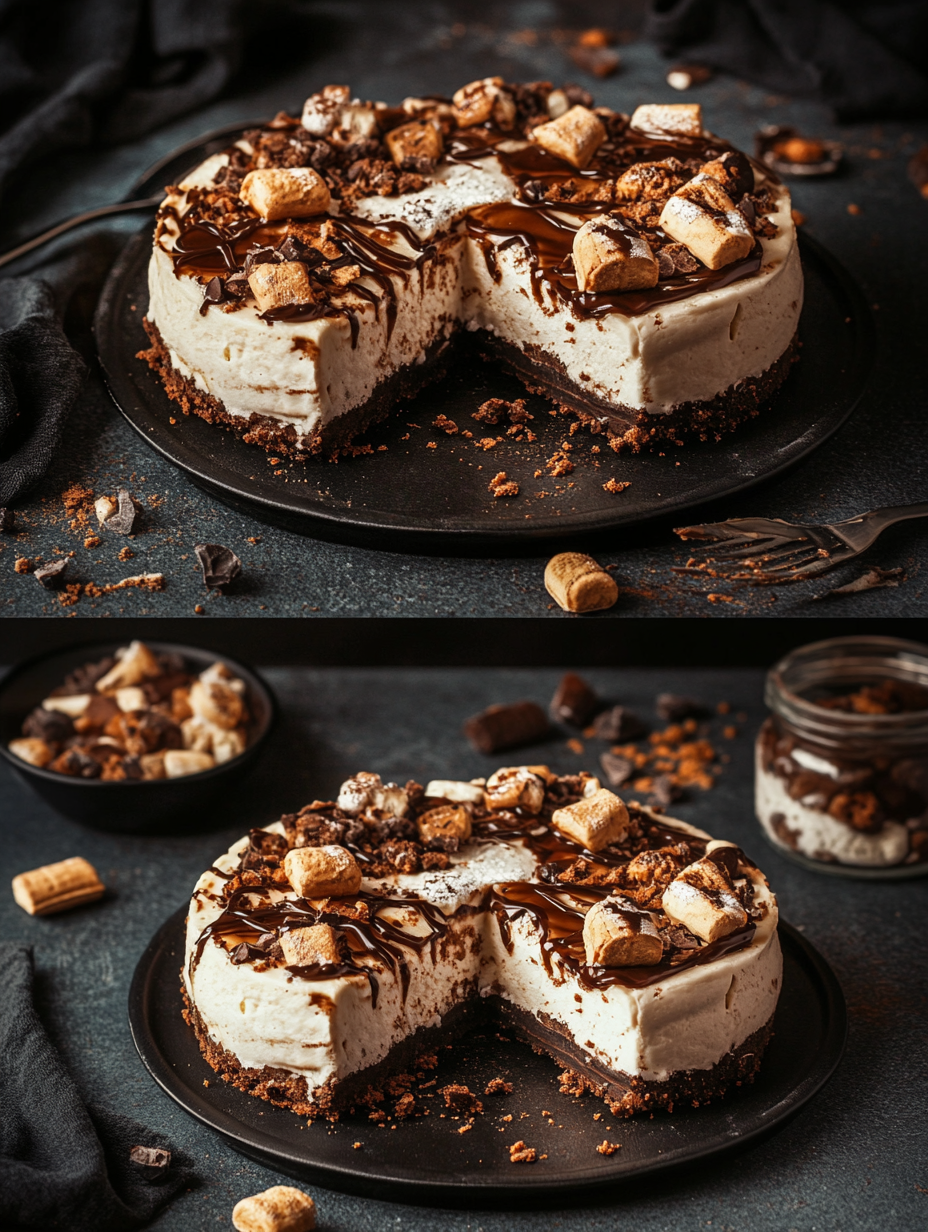
As you indulge in this cheesecake, the flavors will whisk you back to those simpler, joyful moments of childhood. The rich, velvety filling, complemented by a crunchy chocolate graham cracker crust and topped with fluffy mini marshmallows, is a delightful nod to the beloved s’mores we all know and love. With each bite, you’ll find a perfect balance of sweetness and nostalgia—it’s an experience you won’t want to miss!
Why This Recipe Works
Creating a no bake s’mores cheesecake might sound simple, but the magic lies in the details. By using cream cheese as the base, you get an incredibly rich and creamy texture that mirrors the indulgent taste of traditional cheesecakes while being light enough to enjoy any time of year. The whipped cream folded into the cream cheese adds a lightness that prevents the cheesecake from feeling heavy, making it a perfect dessert for warmer months.
The graham cracker crust, combined with cocoa powder, introduces a chocolatey crunch that beautifully complements the creamy filling. The combination of granulated sugar and melted unsalted butter binds the crust together, creating a firm yet crumbly base that provides a satisfying contrast to the smooth cheesecake layer.
The addition of mini marshmallows and chocolate chips as toppings not only enhances the visual appeal of the cheesecake but also adds textural elements that make every bite enjoyable. As you take your first slice, the melted chocolate and toasted marshmallows create an authentic s’mores experience without needing a campfire!
Moreover, this no-bake technique is a game-changer, allowing you to whip up this indulgent dessert in just a few simple steps without the worry of oven temperatures or baking times. With the right balance of flavors and textures, this cheesecake is bound to become a family favorite, just like the classic campfire treat.
What Makes It Special
What sets this no bake s’mores cheesecake apart from store-bought or restaurant versions is its homemade charm and the ability to customize it to your liking. Here are a few unique qualities that make this dessert truly special:
– Fresh Ingredients: Unlike many store-bought cheesecakes that can be packed with preservatives, this recipe uses fresh, high-quality ingredients that you can choose yourself. The rich cream cheese and real chocolate create unparalleled flavors that store-bought alternatives simply can’t match.
– Guilt-Free Indulgence: This cheesecake captures the essence of s’mores without being overly heavy. The no-bake method and light whipped cream result in a dessert that feels decadent yet airy, allowing you to enjoy a slice (or two) without the guilt!
– Versatile Toppings: While we love the classic mini marshmallows and chocolate chips, you can easily customize the toppings based on your preferences. Crushed nuts, caramel drizzle, or even a sprinkle of sea salt can elevate the flavors to a whole new level, making it your unique creation.
– Perfect for Any Occasion: This dessert isn’t just for summer cookouts; it’s perfect for birthdays, holidays, or even a cozy night in. The delightful combination of flavors makes it a crowd-pleaser no matter the season.
This no bake s’mores cheesecake is a celebration of flavors and memories, making it a standout dessert that you’ll want to share with friends and family.
Ingredient Breakdown

Creating the perfect no bake s’mores cheesecake starts with understanding each ingredient’s role in the recipe. Here’s a breakdown of what makes each ingredient essential, including alternatives for dietary needs:
– Graham Cracker Crumbs (1.5 cups): The backbone of any s’mores dessert, these crumbs provide the classic crunchy texture and flavor. You can substitute with gluten-free graham crackers, or if you prefer a different flavor profile, crushed chocolate cookies or vanilla wafers work beautifully too.
– Unsweetened Cocoa Powder (0.5 cups): This is what gives the crust its rich chocolatey flavor. If you’re looking for a healthier option, consider using carob powder or a cacao powder to maintain that chocolate essence with a different nutritional profile.
– Granulated Sugar (0.5 cups): This sweetens the crust just enough to balance the flavors. If you’re watching your sugar intake, feel free to use coconut sugar or a sugar substitute like erythritol.
– Unsalted Butter (0.5 cups): Butter binds the crust together and adds a richness that enhances the overall flavor. For a dairy-free version, you can use coconut oil or a plant-based butter alternative.
– Cream Cheese (16 oz): The star of the cheesecake filling, cream cheese gives it a creamy and tangy flavor. For a lighter option, consider using Neufchâtel cheese. If you need a non-dairy substitute, look for cashew or tofu cream cheese.
– Powdered Sugar (1 cup): This helps sweeten the filling and adds a smooth texture. You can swap this for a powdered sugar alternative or use a blend of granulated sugar and cornstarch for a similar effect.
– Heavy Whipping Cream (1 cup): Whipped cream adds fluffiness to the cheesecake. For a non-dairy option, use coconut cream or a plant-based whipping cream.
– Vanilla Extract (1 tsp): This enhances the flavors in the cheesecake. Opt for pure vanilla extract for the best flavor or a vanilla bean paste for added depth.
– Mini Marshmallows (1 cup): These add the classic s’mores element and a fun texture. If you’re going for a more elegant look, toasted marshmallow fluff can also be a creative alternative.
– Chocolate Chips (0.5 cups): These are melted and drizzled on top for that luscious chocolate experience. You can use dark, semi-sweet, or dairy-free chocolate chips depending on your preference.
By understanding the role of each ingredient, you can tailor the cheesecake to meet your dietary needs while still delivering an unforgettable dessert.
Step-by-Step Instructions
1. Prepare the Crust
– What: Start by making the crust for your cheesecake.
– How: In a mixing bowl, combine 1.5 cups of graham cracker crumbs, 0.5 cups of unsweetened cocoa powder, 0.5 cups of granulated sugar, and 0.5 cups of melted unsalted butter.
– What to look/smell/hear: Mix until it resembles wet sand. You should smell the sweetness of the sugars and the warm butter. When you press the mixture together, it should hold its shape.
2. Form the Crust
– What: Now, you need to create a sturdy base for your cheesecake.
– How: Firmly press the crumb mixture into the bottom of a 9-inch springform pan to create an even crust. Use the bottom of a measuring cup or your fingers to ensure it’s compact and even.
– What to look/smell/hear: As you press, you should hear a satisfying crunch. The crust should feel solid and not crumble apart when lightly touched. Place it in the refrigerator for about 15-20 minutes to set.
3. Make the Cream Cheese Filling
– What: After the crust is chilled, it’s time to prepare the cheesecake filling.
– How: In a large bowl, beat 16 oz of softened cream cheese and 1 cup of powdered sugar together until the mixture is smooth and creamy, free of lumps.
– What to look/smell/hear: You should smell the rich cream cheese aroma as it becomes velvety. The mixer should hum softly as the ingredients blend thoroughly.
4. Whip the Cream
– What: Create a light and airy texture by whipping the cream.
– How: In another bowl, whip 1 cup of heavy whipping cream and 1 tsp of vanilla extract together until stiff peaks form.
– What to look/smell/hear: You’ll notice the cream thickening, and it should start to form soft peaks. When you lift the whisk, the peaks should hold their shape without collapsing. The vanilla should provide a sweet aroma.
5. Combine the Mixtures
– What: This step combines the rich cream cheese with the light whipped cream.
– How: Gently fold the whipped cream into the cream cheese mixture until it’s well incorporated. Use a spatula to avoid deflating the whipped cream.
– What to look/smell/hear: You’ll see the mixture transform into a fluffy, creamy filling that’s light and airy. The aroma will be a delightful blend of sweet cream cheese and vanilla.
6. Assemble the Cheesecake
– What: Pour the filling into the prepared crust.
– How: Spread the cheesecake filling evenly over the crust and smooth the top with a spatula. Cover it with plastic wrap.
– What to look/smell/hear: The filling should glide easily over the crust, creating a beautiful, even layer. You’ll smell the combination of the creamy cheesecake as you work.
7. Chill and Finish
– What: Allow the cheesecake to set before serving.
– How: Refrigerate the cheesecake for at least 2 hours. Once set, top with mini marshmallows and drizzle with melted chocolate chips.
– What to look/smell/hear: After chilling, the cheesecake will firm up, and you’ll smell the sweet marshmallows and rich chocolate as you prepare to serve it. When you cut into it, you should hear a satisfying slice through the creamy filling.
Chef’s Note: Ensure your cream cheese is at room temperature for easy mixing and a smooth filling.
Pro Tips for the Best Results
– Use Fresh Ingredients: Always opt for fresh cream cheese and heavy cream to ensure your cheesecake has the best flavor and texture.
– Room Temperature Cream Cheese: Let your cream cheese come to room temperature before mixing; this will help achieve a smoother, lump-free filling.
– Chill the Bowl: For an extra fluffy whipped cream, chill your mixing bowl and whisk beforehand. This keeps the cream cold and helps it whip up more easily.
– Don’t Overmix: When folding the whipped cream into the cream cheese mixture, be gentle. Overmixing can deflate the whipped cream, leading to a denser filling rather than a light and airy one.
– Experiment with Toppings: While mini marshmallows and melted chocolate are classic, consider adding crushed graham crackers or a sprinkle of sea salt for a gourmet touch.
– Patience is Key: Allowing the cheesecake to set for at least two hours (or overnight if possible) will improve its texture and flavor. It also makes slicing easier.
– Use a Hot Knife: For cleaner slices, dip your knife in hot water, then wipe it before cutting each piece. This prevents the filling from sticking to the knife.
Common Mistakes to Avoid
1. Using Cold Cream Cheese: If your cream cheese is cold, it can create lumps in the filling. Always let it sit at room temperature before mixing.
2. Skipping the Chilling Step: Not allowing the cheesecake to set properly can lead to a runny filling. It’s essential to chill for at least two hours.
3. Overmixing the Whipped Cream: Be careful not to overmix your whipped cream; it can turn grainy and lose its airy texture, affecting the overall lightness of the cheesecake.
4. Not Pressing the Crust Firmly: If the crust isn’t pressed down firmly, it may crumble when you slice the cheesecake. Ensure it’s compact and even for the best results.
5. Using Sweetened Cocoa Powder: Stick to unsweetened cocoa powder for the crust. Sweetened versions can make the cheesecake overly sweet.
6. Ignoring the Chocolate Drizzle: Skipping the drizzle of melted chocolate on top may leave your cheesecake looking bare and lacking that authentic s’mores appeal. A good drizzle adds flavor and visual appeal.
7. Improper Storage: If you’re not serving right away, make sure to cover the cheesecake tightly with plastic wrap to prevent it from absorbing other flavors in the refrigerator.
Creative Variations
1. Seasonal S’mores Cheesecake: Incorporate seasonal flavors by adding pumpkin puree and spices in the fall or fresh berries in the summer. A layer of berry compote on top adds a refreshing twist.
2. Dietary-Friendly S’mores Cheesecake: For a gluten-free version, use gluten-free graham crackers for the crust. You can also swap out the heavy cream for coconut cream for a dairy-free option.
3. Gourmet Elevated S’mores Cheesecake: Elevate your cheesecake by adding a layer of caramel sauce between the crust and filling. Top with gourmet dark chocolate and a sprinkle of flaky sea salt for an adult version of the classic treat.
4. Quick 15-Minute S’mores Cheesecake: Use store-bought cheesecake filling and a pre-made crust to create a quick version. Simply mix in marshmallow fluff and chocolate chips, then chill. It’s perfect when you’re short on time!
5. Kid-Friendly S’mores Cheesecake: Involve the kids by letting them help. Use fun toppings like colored sprinkles or candied chocolate bars. You can even shape the marshmallows into fun designs to engage their creativity.
6. International Twist: Add a touch of international flair by incorporating matcha or chai spices into the filling for a unique flavor profile. This brings a whole new dimension to the classic s’mores experience.
7. Chocolate Mint S’mores Cheesecake: For a refreshing twist, add peppermint extract to the cream cheese mixture and garnish with crushed mint chocolate candies or Andes mints for a delightful seasonal dessert.
Serving Ideas
When it comes to serving your No Bake S’mores Cheesecake, presentation is key. Here are a few delightful plating ideas that will impress your guests:
1. Rustic Style: Serve the cheesecake directly from the springform pan, garnished with a sprinkle of crushed graham crackers around the edge for a rustic feel.
2. Individual Servings: Slice the cheesecake into small squares and place each piece on a mini dessert plate. Top with a few extra mini marshmallows and a drizzle of chocolate sauce for an elegant touch.
3. Layered Parfaits: For a fun twist, layer the cheesecake filling with additional graham cracker crumbs and chocolate sauce in clear cups. This not only looks beautiful but allows guests to see the delicious layers.
4. S’mores Platter: Create a themed dessert platter with slices of cheesecake, fresh strawberries, and mini chocolate bars. This encourages a playful approach as guests can mix and match their favorite sweet flavors.
5. Chocolate Dipped Edge: Before serving, dip the edges of each slice into melted chocolate and then into crushed graham crackers. This adds a decadent touch and enhances the s’mores experience.
By considering these serving styles, you can elevate your cheesecake from a simple dessert to a stunning centerpiece that will have everyone reaching for seconds.
What to Serve With
Pairing your No Bake S’mores Cheesecake with complementary flavors can take your dessert experience to the next level. Here are some delightful options:
1. Fresh Berries: Strawberries, raspberries, or blueberries provide a tart contrast to the rich sweetness of the cheesecake, balancing the flavors perfectly.
2. Coffee: A cup of freshly brewed coffee or espresso pairs wonderfully, as the bitterness cuts through the creaminess and enhances the chocolate notes in the cheesecake.
3. Mint Tea: The refreshing qualities of mint tea can cleanse the palate, making it a delightful accompaniment to the rich s’mores flavors.
4. Ice Cream: A scoop of vanilla or chocolate ice cream adds an extra layer of indulgence. The coldness of the ice cream contrasts beautifully with the creamy cheesecake.
5. A Dessert Wine: A sweet dessert wine or a fruity Moscato can complement the flavors of the cheesecake, enhancing the overall tasting experience.
6. Caramel or Chocolate Sauce: Offering a side of warm caramel or chocolate sauce for drizzling can elevate the dessert, giving your guests the option to customize their slice.
These pairings not only enhance the flavors of your cheesecake but also create an enjoyable dessert experience that your guests will remember.
Storage Guide
To keep your No Bake S’mores Cheesecake fresh and delicious, proper storage is essential. Here’s how to do it:
– Container Type: Store the cheesecake in an airtight container or tightly wrap it in plastic wrap. This prevents air exposure and keeps it moist.
– Temperature: Always store the cheesecake in the refrigerator at a temperature of 35°F to 40°F (1.7°C to 4.4°C).
– Shelf Life: When stored properly, your cheesecake can last for about 5-7 days in the fridge. Be sure to check for freshness.
– Signs Gone Bad: If you notice any off smells, discoloration, or mold, it’s best to discard the cheesecake.
– Refreshing: If the cheesecake seems a bit dry after a few days, consider topping it with a fresh layer of whipped cream or a drizzle of chocolate sauce to rejuvenate its flavors.
By following these storage tips, you can enjoy your cheesecake for days to come without losing its creamy goodness.
Freezing Tips
If you want to enjoy your No Bake S’mores Cheesecake later, freezing is a great option. Here’s how to do it right:
– Freezing: Yes, this cheesecake freezes well! To freeze, make sure it’s fully set and chilled.
– Portioning: Slice the cheesecake into individual squares or wedges. This will make it easier to thaw only what you need.
– How Long: The cheesecake can be frozen for up to 2-3 months. Just ensure it’s wrapped tightly in plastic wrap or placed in an airtight container to prevent freezer burn.
– Thawing Method: When you’re ready to enjoy, transfer the cheesecake to the fridge and let it thaw overnight. If you’re in a hurry, you can also leave it out at room temperature for a couple of hours, but avoid leaving it too long to maintain its texture.
By following these freezing tips, you can savor your cheesecake at a later date without compromising on flavor or texture.
Reheating Guide
While your No Bake S’mores Cheesecake is typically served cold, you might want to warm up portions for a different experience. Here’s how to do it:
– Microwave: Place a slice on a microwave-safe plate and heat it for 10-15 seconds. Check the temperature and heat in additional increments if necessary, but be cautious not to overheat it, as it can change the texture.
– Oven: Preheat your oven to 300°F (150°C). Place a slice of cheesecake on a baking sheet and cover it loosely with foil. Warm for about 10-15 minutes, checking to ensure it doesn’t get too hot.
– Stovetop: If you prefer a stovetop method, place a slice in a small skillet over low heat. Cover with a lid to trap heat and warm for about 5-10 minutes, checking frequently to avoid burning.
Using these methods, you can enjoy your cheesecake warm, enhancing its creamy texture and chocolatey flavor.
Nutrition Overview
Indulging in a slice of No Bake S’mores Cheesecake not only satisfies your sweet tooth but also provides some nutritional benefits. Here’s a quick breakdown:
– Calories: Each serving contains approximately 400-450 calories, depending on the portion size and exact ingredients used.
– Macros: You can expect around 25 grams of fat, 40 grams of carbohydrates, and 6 grams of protein per serving.
– Health Benefits:
– Cream Cheese: Contains calcium and provides a rich source of protein, essential for muscle repair and growth.
– Graham Crackers: Provide fiber which aids digestion and can help keep you feeling full.
– Heavy Cream: While it’s high in fat, it also offers a source of vitamin A, important for skin and vision health.
Enjoy this dessert knowing that it has some redeeming qualities, even as you indulge in its rich flavors!
Frequently Asked Questions
Q: Can I use low-fat cream cheese instead?
A: Yes, you can substitute low-fat cream cheese, but keep in mind that it may alter the texture and flavor of the cheesecake slightly.
Q: How can I make this cheesecake gluten-free?
A: To make a gluten-free version, use gluten-free graham crackers or alternative crust options like almond flour or gluten-free cookies.
Q: Can I add other flavors to the cheesecake?
A: Absolutely! You can mix in peanut butter, caramel, or even fruit purees to customize the flavor of your cheesecake.
Q: How do I prevent cracks in the cheesecake?
A: Since this is a no-bake cheesecake, cracks are less of a concern. However, ensure you blend the ingredients well and avoid over-whipping the cream.
Q: Can I use a different type of chocolate?
A: Yes, you can use dark chocolate, white chocolate, or even flavored chocolate chips for a fun twist on the classic s’mores flavor.
Q: Is there a vegan alternative for this cheesecake?
A: You can create a vegan version by using vegan cream cheese and coconut cream, along with plant-based graham crackers for the crust.
Q: How do I know when the cheesecake has set?
A: The cheesecake is set when it feels firm to the touch and no longer wobbles in the center when gently shaken.
Q: What’s the best way to slice the cheesecake?
A: For clean slices, dip a knife in hot water, wipe it clean, and then slice through the cheesecake. This will give you smooth edges.
Final Thoughts
Creating a No Bake S’mores Cheesecake is not just about following a recipe; it’s about sharing joy and warmth with those you love. Remember, the key to a successful cheesecake is patience—allow it to set well so you can enjoy that perfect creamy texture.
Don’t hesitate to get creative with toppings or pairings; this dessert is as versatile as it is delicious. So, roll up your sleeves, gather your ingredients, and dive into this delightful treat. Enjoy every bite and the smiles it brings—your friends and family will thank you!