Follow Me On Pinterest!
No Bake Lemon Cream Cheesecake

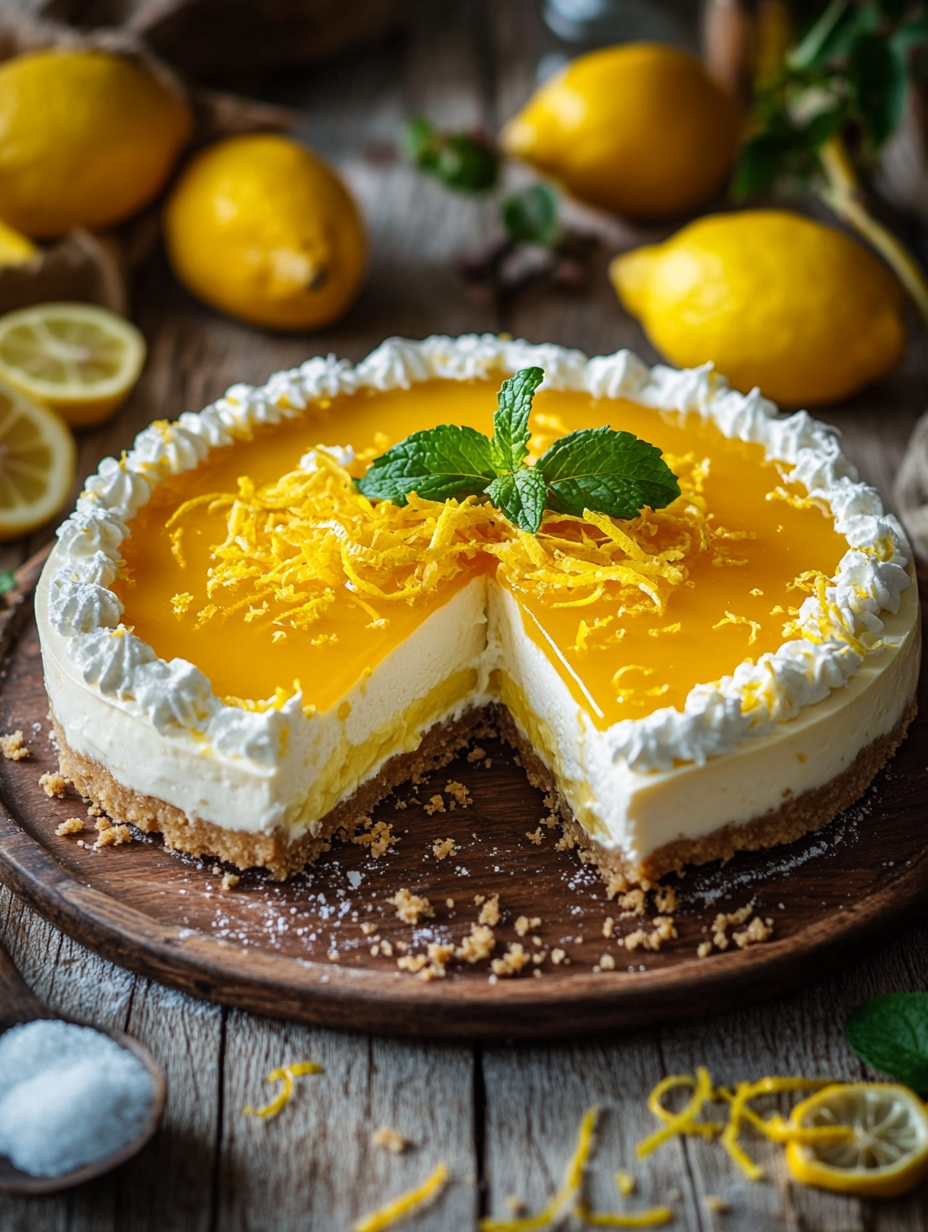
No Bake Lemon Cream Cheesecake: A Refreshing Slice of Sunshine
Introduction
As the sun begins to warm the earth and the flowers burst into bloom, you might find yourself yearning for something light and refreshing—a dessert that captures the essence of spring. For me, that dessert has always been No Bake Lemon Cream Cheesecake. I still remember the first time I had a slice at my grandmother’s house on a balmy afternoon. The air was fragrant with blooming lilacs, and laughter filled the room as we gathered around the table. It was a special occasion, a family reunion, and my grandmother had pulled out all the stops.
When she brought out that cheesecake, its pale yellow filling glistening under the soft sunlight, it was as if she had captured summer in a dessert. The first bite was pure bliss! The creaminess of the cheesecake, paired with the zesty lemon flavor, offered an exhilarating contrast that awakened my palate. Each luscious forkful was like a burst of sunshine, making it impossible to resist.
From that day forward, lemon cheesecake became my favorite dessert—a symbol of family gatherings and cherished memories. It’s a recipe that has been passed down through generations, and I’ve made it my own by perfecting the flavors while keeping it simple and accessible. This No Bake Lemon Cream Cheesecake is the perfect treat for those warm days when you want something easy to whip up yet utterly delightful to enjoy with loved ones.
Why This Recipe Works
What makes this No Bake Lemon Cream Cheesecake a standout is its no-bake technique. Unlike traditional cheesecakes that require baking, this recipe allows you to skip the oven, making it a perfect choice for warm weather or when you’re short on time. The cream cheese provides a rich, velvety base, while the sour cream adds a delightful tang that complements the zesty lemon. The combination creates a filling that is not only smooth but also incredibly flavorful.
The beauty of this cheesecake lies in the balance of flavors and textures. You’ll experience the crunch of the graham cracker crust against the silky filling, which is brightened by fresh lemon juice and zest. This recipe is also flexible! You can easily adjust the lemon to suit your taste—a little more zest for those who love a punch of citrus, or you can even swap in different flavors, such as lime or orange, for a refreshing twist.
Moreover, the refrigeration process allows the cheesecake to firm up without the risk of cracking that comes with baking. This means you’ll achieve a beautiful and creamy dessert every single time, making it a reliable go-to for gatherings or quiet evenings at home.
What Makes It Special
This No Bake Lemon Cream Cheesecake has several unique qualities that distinguish it from the store-bought or restaurant versions you may encounter.
– Fresh Ingredients: Using fresh lemon juice and zest elevates the flavor profile far beyond any pre-packaged option. The bright, zesty notes are vibrant and add a refreshing quality that’s essential for any lemon dessert.
– Versatility: Unlike many cheesecakes that can be overly rich or heavy, this recipe strikes a perfect balance. It’s creamy yet light, making it suitable for any occasion—be it a summer picnic or a cozy family dinner.
– Ease of Preparation: The simplicity of the no-bake method allows you to whip this up without much fuss. You don’t need to worry about water baths or monitoring oven temperatures. Just mix, pour, and chill!
– Customizable: This recipe serves as a fantastic base that you can easily customize. Whether you want to add a berry topping, layer in some chocolate, or even infuse it with herbs like basil or mint, the possibilities are endless.
With these attributes in mind, you can see why this cheesecake stands out as a beloved dessert that’s not just easy to make but also a joy to eat.
Ingredient Breakdown
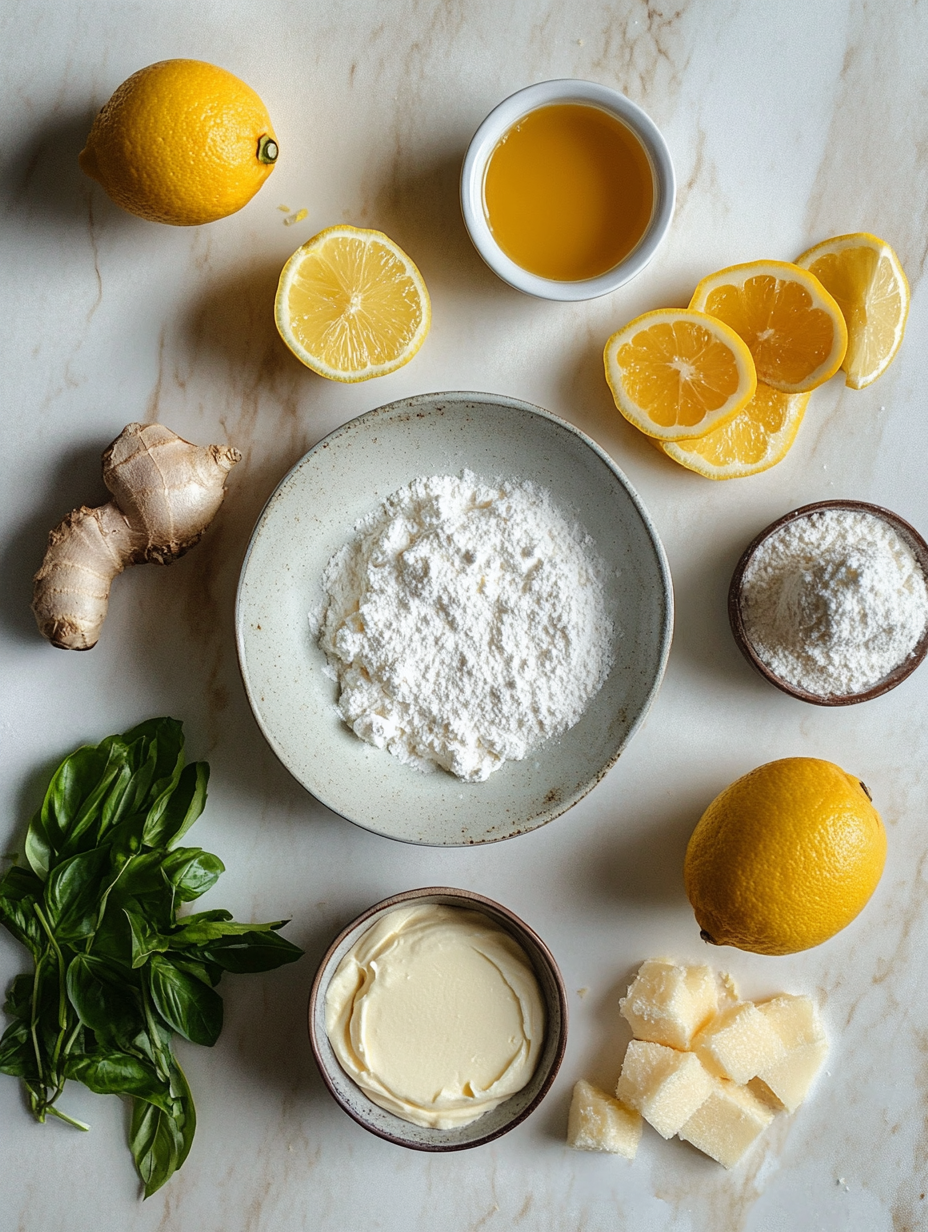
1. Graham Cracker Crumbs: This classic base provides a delicious crunch that pairs perfectly with the creamy filling. If you’re looking for a gluten-free option, you can use gluten-free graham crackers or even ground almonds or oats for a nutty twist.
2. Unsalted Butter: The butter binds the graham cracker crumbs together and adds richness to the crust. Using unsalted butter lets you control the saltiness of the dessert. If you prefer a dairy-free version, consider using a plant-based butter substitute.
3. Cream Cheese: The star of the show! Cream cheese gives the cheesecake its signature creamy texture. Make sure it’s softened; this will ensure that your filling is smooth and free of lumps. If you need a lighter option, you might choose a lower-fat cream cheese or even a vegan cream cheese, which works surprisingly well.
4. Powdered Sugar: This sweetens the filling without the graininess of granulated sugar. It also contributes to a smooth texture. If you’re watching your sugar intake, you can substitute with powdered erythritol or another sugar alternative that measures 1:1.
5. Sour Cream: It adds a tang that balances the sweetness of the cheesecake. Sour cream also helps to create a lighter texture. If you’re looking for a dairy-free option, you can substitute with cashew cream or dairy-free yogurt.
6. Fresh Lemon Juice: This is what brings the zesty brightness to the cheesecake. Freshly squeezed juice is crucial for the best flavor. You can also experiment with different citrus juices for a unique twist.
7. Lemon Zest: The zest intensifies the lemon flavor, giving it a fragrant aroma and vibrant taste. Always use fresh zest for the best results. If you’re out of lemons, lime zest can provide a delightful variation.
8. Vanilla Extract: A touch of vanilla rounds out the flavors and enhances the sweetness. If you want a more pronounced vanilla flavor, consider using vanilla bean paste or even blending in some vanilla powder.
Equipment Needed
1. 9-Inch Springform Pan: This is essential for easy removal of the cheesecake. The springform design allows you to release the sides without damaging your dessert. If you don’t have one, a regular cake pan will do, but be prepared to cut slices directly from it.
2. Mixing Bowls: You’ll need a couple of mixing bowls—one for the crust and another for the filling. Opt for glass or stainless steel for easy cleaning.
3. Electric Mixer: A hand mixer or stand mixer will make quick work of beating the cream cheese to a smooth consistency. If you don’t have either, a whisk and a bit of elbow grease will still get the job done!
4. Spatula: A rubber spatula is helpful for scraping down the sides of your mixing bowl and spreading the cheesecake filling evenly over the crust.
5. Measuring Cups and Spoons: Accurate measurements are key to achieving the right flavors and textures.
With these tools in hand, you’ll be well-prepared to create a stunning No Bake Lemon Cream Cheesecake that will impress family and friends alike.
Step-by-Step Instructions
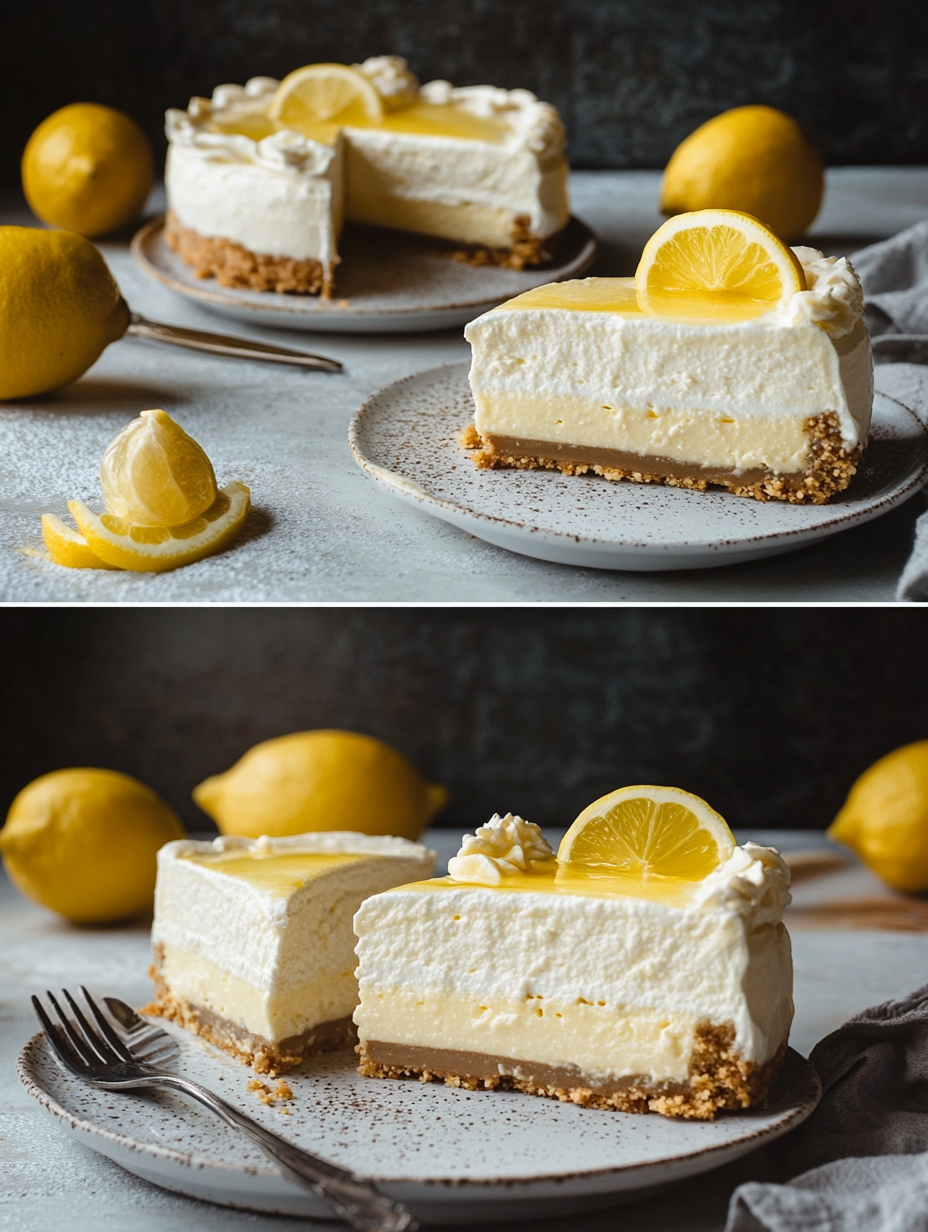
1. Prepare the Crust
What: Start by creating the graham cracker crust.
How: In a medium bowl, combine 1 cup of graham cracker crumbs with 0.5 cup of melted unsalted butter. Use a fork or your hands to mix them until all the crumbs are coated and the mixture resembles wet sand.
What to look/smell/hear: You’ll know it’s ready when you can press it together, and it holds its shape. The buttery aroma should fill the air, making you eager for the next steps.
2. Form the Crust
What: Shape the crust into the springform pan.
How: Press the graham cracker mixture firmly into the bottom of a 9-inch springform pan. Use the back of a measuring cup or your fingers to make sure it’s even and compact.
What to look/smell/hear: Listen for the crunch of the crumbs as you press down, and ensure it feels tightly packed, creating a solid base for your cheesecake.
3. Beat the Cream Cheese
What: Create a smooth filling by beating the cream cheese.
How: In a large mixing bowl, beat 16 ounces of softened cream cheese with a hand mixer or stand mixer on medium speed until it’s smooth and creamy, about 2-3 minutes.
What to look/smell/hear: The mixture should be lump-free and silky. The subtle scent of cream cheese should be evident, indicating it’s blended well.
4. Mix in Additional Ingredients
What: Add flavor and sweetness to the cream cheese.
How: Gradually add 0.5 cup of powdered sugar, 0.5 cup of sour cream, 0.25 cup of fresh lemon juice, 1 tablespoon of lemon zest, and 1 teaspoon of vanilla extract to the bowl with the cream cheese. Beat until everything is well combined and smooth, about 2-3 minutes.
What to look/smell/hear: The filling should be creamy and thick. You’ll start to smell the fresh lemon and vanilla, which will get your taste buds excited!
5. Pour the Filling into the Crust
What: Transfer the cheesecake filling to your crust.
How: Carefully pour the cream cheese mixture over the prepared crust. Use a spatula to spread it evenly across the crust.
What to look/smell/hear: The filling should have a luscious, glossy appearance. As you spread it, take in the fragrant notes of lemon and vanilla wafting through your kitchen.
6. Chill Until Set
What: Allow the cheesecake to firm up.
How: Cover the springform pan with plastic wrap and refrigerate for at least 2 hours or until it’s set completely.
What to look/smell/hear: The cheesecake will firm up as it chills, and you’ll know it’s ready when it feels firm to the touch. The sweet and tangy aroma will entice you to sneak a taste!
Chef’s Note: Ensure the cream cheese is at room temperature before mixing to achieve that ultra-smooth texture. Also, don’t skimp on the chilling time; it helps enhance the flavors and sets the cheesecake perfectly.
Pro Tips for the Best Results
1. Use Fresh Ingredients: Opt for fresh lemon juice and zest for a more vibrant flavor. Bottled lemon juice can alter the taste, making it less bright and zesty.
2. Room Temperature Cream Cheese: Always let your cream cheese sit out for about 30 minutes before using it. This prevents lumps and helps achieve that perfect creamy consistency.
3. Chill Your Bowl and Beating Attachments: For ultra-fluffy cream, chill your mixing bowl and beaters in the fridge before whipping the cream cheese mixture. This helps incorporate air more effectively.
4. Don’t Rush the Mixing: Take your time while mixing the filling. A well-blended cheesecake is key to a smooth texture. Aim for a glossy finish before pouring it into the crust.
5. Adjust Sweetness to Your Preference: Taste the filling before pouring it into the crust. If you prefer a sweeter cheesecake, feel free to add an extra tablespoon of powdered sugar.
6. Let it Set Overnight: If you can wait, letting the cheesecake set overnight enhances the flavors and results in a firmer texture.
7. Avoid Overmixing: Once you add the powdered sugar, beat just enough to combine. Overmixing can incorporate too much air, causing cracks as it sets.
8. Serve with a Garnish: A dollop of whipped cream, additional lemon zest, or fresh berries on top adds a delightful touch and enhances the presentation.
Common Mistakes to Avoid
1. Using Cold Cream Cheese: Starting with cold cream cheese can lead to a lumpy filling. Always allow it to come to room temperature for the best results.
2. Not Packing the Crust Firmly Enough: If the crust isn’t packed tightly, it can crumble when you slice the cheesecake. Make sure to press it down firmly for a sturdy base.
3. Skipping the Chilling Time: Rushing the chilling process will result in a soft cheesecake that doesn’t hold its shape. Be patient; it’s worth the wait!
4. Not Tasting the Filling: Forgetting to taste the filling before chilling can lead to an overly sweet or tangy cheesecake. Always check for balance before setting.
5. Using Dull Ingredients: Using old or stale graham crackers can dampen the flavor of your crust. Fresh ingredients make all the difference.
6. Overmixing the Filling: Beating the filling too much can introduce excess air, leading to cracks as it sets. Mix just until combined for a smooth finish.
7. Forgetting to Use a Springform Pan: Using a regular pan can make it nearly impossible to remove the cheesecake without damaging it. A springform pan allows for easy removal and beautiful presentation.
Creative Variations
1. Seasonal Lemon Cheesecake: Add seasonal fruits to your cheesecake for a fresh twist. In spring, consider folding in some mashed strawberries or blueberries into the filling before pouring it into the crust. In fall, pumpkin spice can add a cozy flavor.
2. Dietary-Friendly Version: For a healthier cheesecake, substitute the cream cheese with Greek yogurt or a vegan cream cheese alternative. You can also use sugar substitutes like stevia or monk fruit sweetener to suit your dietary needs.
3. Gourmet Elevated: Elevate your cheesecake by infusing the filling with herbs like thyme or basil for a sophisticated flavor profile. Top with a lemon-thyme syrup or candied lemon slices for an elegant presentation.
4. Quick 15-Minute Version: In a pinch? Use a store-bought graham cracker crust and ready-made lemon curd. Simply mix the lemon curd with cream cheese and sour cream, pour into the crust, and chill for a quick dessert that still impresses.
5. Kid-Friendly Twist: Make it fun! Incorporate crushed candy like gummy bears or sprinkles into the filling for a kid-friendly treat. You can also swap the lemon for favorite flavors like chocolate or strawberry.
6. International Twist: Explore flavors from around the world! Try incorporating matcha powder for an Asian-inspired cheesecake or mix in mango puree for a tropical vibe. Alternatively, a chocolate layer can be added on top for a decadent fusion.
7. No-Bake Chocolate Lemon Cheesecake: Combine the best of both worlds by making a chocolate crust with crushed Oreos, then layer the lemon filling on top. The contrast between the citrus and chocolate flavors is divine and unexpected!
Serving Ideas
When it comes to serving your No Bake Lemon Cream Cheesecake, presentation is key! Here are a few delightful serving ideas to make your dessert truly shine:
1. Individual Servings: Instead of slicing the cheesecake, consider using small mason jars or dessert cups to serve individual portions. This way, each guest gets their own little slice of heaven, and it’s perfect for picnics or casual gatherings.
2. Garnished with Fresh Berries: Top each slice or jar with a selection of fresh berries, like raspberries or blueberries. Not only do they add a pop of color, but their tartness complements the creaminess of the cheesecake wonderfully.
3. Lemon Twist Garnish: For an elegant touch, use a vegetable peeler to create thin curls of lemon zest. Arrange these curls artfully on top of each slice to enhance the citrus flavor and make the cheesecake look extra special.
4. Drizzle of Honey or Lemon Syrup: A gentle drizzle of honey or a homemade lemon syrup can elevate the flavor profile. Simply mix lemon juice with a little sugar and heat until dissolved, then drizzle over the cheesecake before serving.
5. Serve with Whipped Cream: A dollop of freshly whipped cream on top offers a classic pairing. You can sweeten it lightly with powdered sugar and a hint of vanilla for a delightful finish.
What to Serve With
Complementing your No Bake Lemon Cream Cheesecake with the right accompaniments can elevate the entire dessert experience. Here are several pairings that work beautifully:
1. Herbal Iced Tea: The refreshing notes of herbal iced tea balance the richness of the cheesecake. A hint of mint or basil in the tea can enhance the lemony flavor.
2. Sparkling Wine or Prosecco: The effervescence of sparkling wine or Prosecco adds a celebratory touch. The acidity in the wine cuts through the creaminess, making it a perfect pairing for a summer dessert.
3. Coconut Macaroons: The chewy texture of coconut macaroons provides a delightful contrast to the smooth cheesecake. Their sweet, toasty flavor pairs well with the zesty lemon.
4. Fresh Fruit Salad: A simple fruit salad, featuring seasonal fruits, adds a refreshing element. The natural sweetness and juiciness of the fruits complement the tartness of the cheesecake beautifully.
5. Coffee or Espresso: For coffee lovers, serving a cup of freshly brewed coffee or a shot of espresso can be a delightful end to your meal. The bitterness of coffee balances the sweetness, making every bite of cheesecake more enjoyable.
Storage Guide
To ensure your No Bake Lemon Cream Cheesecake remains fresh and delicious, proper storage is essential. Here’s how to store it:
– Container Type: Store your cheesecake in an airtight container or cover it tightly with plastic wrap or aluminum foil. If you used a springform pan, simply keep it in the pan and cover it.
– Temperature: Keep the cheesecake refrigerated at or below 40°F (4°C). The cool temperature is crucial to maintaining its texture and flavor.
– Shelf Life: When stored properly, your cheesecake will last for up to 5 days in the refrigerator. Be sure to check for freshness before serving.
– Signs of Spoilage: If you notice any off smells, discoloration, or changes in texture, it’s best to discard the cheesecake. Look for any signs of mold or excessive moisture as indicators of spoilage.
– Refreshing: If the cheesecake has been stored for a few days and seems a bit dry, you can refresh it by adding a layer of whipped cream on top. This not only adds moisture but also enhances presentation.
Freezing Tips
Freezing your No Bake Lemon Cream Cheesecake is a great way to extend its shelf life. Here’s how to do it effectively:
– Freezing Well: This cheesecake freezes quite well due to its creamy texture. However, for the best results, it’s recommended to freeze individual slices rather than the whole cheesecake.
– Portioning: Cut the cheesecake into slices before freezing. Wrap each slice tightly in plastic wrap, then place them in a freezer-safe bag or airtight container to protect against freezer burn.
– Duration: Your cheesecake can be frozen for up to 2 months. After that, the texture may begin to degrade, affecting the overall quality.
– Thawing Method: To thaw, simply transfer the desired number of slices to the refrigerator for several hours or overnight. If you’re in a hurry, you can leave them at room temperature for about 30 minutes, but be cautious not to let them sit out too long.
Reheating Guide
While you won’t be reheating your No Bake Lemon Cream Cheesecake in the traditional sense, here are some tips on how to warm it slightly if desired:
– Microwave: If you want to take the chill off, place a slice on a microwave-safe plate and heat it on low power (30% setting) for 10-15 seconds. Be careful not to overheat, as it may change the texture.
– Oven: Preheat your oven to 300°F (150°C). Place the cheesecake on a baking sheet and heat for about 10-15 minutes. This method is best if you want to warm an entire cheesecake but keep a close eye to avoid melting.
– Stovetop: If you prefer, you can use a double boiler. Fill a pot with water and bring it to a simmer. Place the cheesecake (in its pan) on top of the pot, making sure it doesn’t touch the water, and let it warm gently for about 10 minutes.
Nutrition Overview
Each serving of this No Bake Lemon Cream Cheesecake is not just delectable but also contains a balance of important nutrients. Here’s a quick look at the nutrition breakdown:
– Calories: Approximately 350 calories per serving.
– Macros: Each slice contains about 27 grams of fat, 24 grams of carbohydrates, and 5 grams of protein.
Key ingredients like cream cheese provide a source of calcium and protein, while sour cream adds beneficial probiotics that support gut health. Lemon juice is rich in vitamin C, which is essential for immune function and skin health. Enjoying this cheesecake can offer a sweet treat without compromising your nutritional goals!
Frequently Asked Questions
Q: Can I use low-fat cream cheese?
A: Yes, you can substitute low-fat cream cheese for a lighter version of this cheesecake. However, the texture may vary slightly, and it may not be as creamy.
Q: How do I know when the cheesecake is set?
A: The cheesecake is set when it feels firm to the touch and holds its shape when you gently shake the pan. It should not jiggle excessively in the center.
Q: Can I add other flavors to this cheesecake?
A: Absolutely! You can incorporate flavors like vanilla, almond, or even a fruit puree. Just be sure to balance the sweetness and acidity.
Q: Is there a gluten-free option for the crust?
A: Yes! You can use gluten-free graham cracker crumbs or alternative crusts made from ground nuts or oats to make this dessert gluten-free.
Q: How can I make this cheesecake more tangy?
A: To enhance the tanginess, you can add more lemon juice and zest. Start with an additional tablespoon and adjust according to your taste preference.
Q: Can I use bottled lemon juice instead of fresh?
A: Fresh lemon juice is recommended for the best flavor, but if you’re in a pinch, bottled lemon juice can be used. Just be aware that the taste may differ slightly.
Q: How long does it take for the cheesecake to set?
A: Allow at least 2 hours in the refrigerator for the cheesecake to set properly. For the best results, consider refrigerating it overnight.
Q: Can I make this cheesecake vegan?
A: Yes, you can create a vegan version by using vegan cream cheese, coconut cream, and a dairy-free crust. Be sure to check labels to ensure all ingredients are plant-based.
Final Thoughts
Indulging in a slice of No Bake Lemon Cream Cheesecake is a delightful experience that brings a burst of sunshine to any occasion. Remember, the key to a successful cheesecake lies in quality ingredients and patience in the chilling process.
When preparing this dessert, consider experimenting with flavors and presentation to make it uniquely yours. Whether you’re hosting a summer gathering or simply treating yourself, this cheesecake is sure to impress. So grab your ingredients, whip up this refreshing dessert, and enjoy the compliments that follow! You deserve it!