Follow Me On Pinterest!
High Hydration Sourdough Focaccia Bubbles
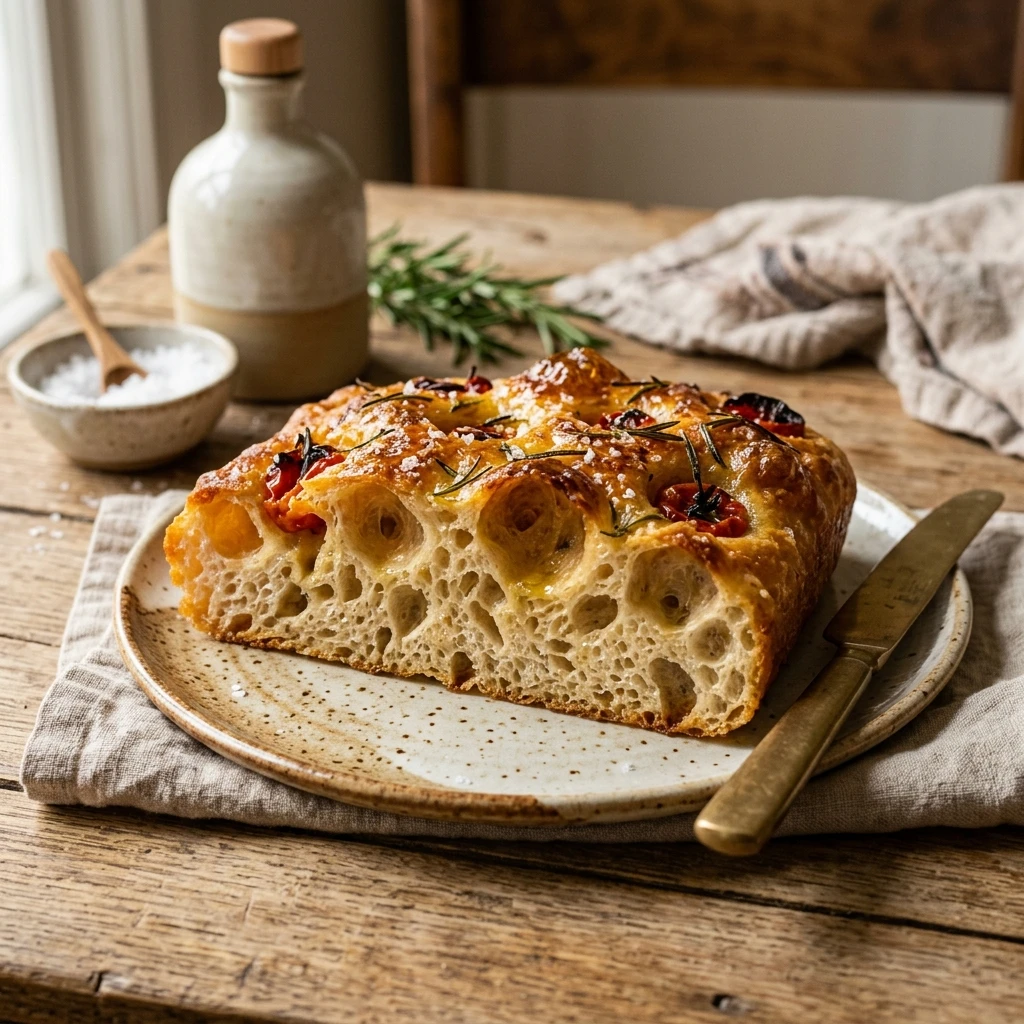
Imagine a bread so airy and light that it feels like biting into a savory cloud, punctuated by a shatteringly crisp, golden-brown crust. That is the magic of High Hydration Sourdough Focaccia Bubbles. Unlike your standard loaf, this focaccia relies on a very high water-to-flour ratio and the slow, natural power of wild yeast. The result is a spectacular display of giant fermentation bubbles that pop and sizzle in a pool of high-quality olive oil. Whether you are a seasoned sourdough pro or a beginner looking to master the art of wet dough, this recipe delivers a restaurant-quality centerpiece that will have everyone reaching for just one more piece.
Recipe Information
- Prep Time: 30 minutes (plus 18–24 hours fermentation)
- Cook Time: 25 minutes
- Total Time: 24 hours 55 minutes
- Servings: 12 servings
- Difficulty: Medium
Nutrition values
- Calories: 210 kcal
- Protein: 6g
- Carbs: 34g
Why Make This High Hydration Sourdough Focaccia Bubbles
This recipe stands out because it maximizes texture and flavor through patience. High hydration dough creates an open, irregular crumb that is impossible to achieve with drier recipes. Using a sourdough starter instead of commercial yeast adds a complex, tangy depth of flavor and improves digestibility. Plus, the process of dimpling the dough and watching those massive bubbles form is incredibly satisfying and therapeutic. It is the ultimate “low-effort, high-reward” bake because the refrigerator does most of the hard work for you.
Ingredients
- 100g active sourdough starter (bubbly and fed)
- 400g warm water (filtered)
- 500g high-protein bread flour
- 12g fine sea salt
- 20g extra virgin olive oil (for the dough)
- 1/4 cup extra virgin olive oil (for the pan and drizzling)
- Flaky sea salt (for topping)
- Fresh rosemary sprigs (optional)
Directions
Step 1: Mixing and Autolyse
In a large mixing bowl, whisk together your active sourdough starter and the warm water until the starter mostly dissolves. Add the bread flour and stir with a spatula or your hands until a shaggy dough forms and no dry flour remains. Cover the bowl with a damp cloth and let it rest for 30 minutes. This allows the flour to fully hydrate and begins the gluten development process naturally.
Step 2: Adding Salt and Initial Folds
Sprinkle the sea salt and 20g of olive oil over the top of the dough. Wet your hands to prevent sticking and begin folding the dough over itself. Reach under one side, pull the dough up, and fold it into the center. Rotate the bowl and repeat this 10–15 times until the salt and oil are fully incorporated and the dough starts to feel smoother. Cover and let rest for 30 minutes.
Step 3: Bulk Fermentation and Stretch and Folds
Over the next 2 hours, perform 4 sets of “stretch and folds” every 30 minutes. To do a set, wet your hands and pull the dough from the four “corners,” folding each side over the top. You will notice the dough becoming stronger and more elastic with each set. After the final fold, cover the bowl tightly and let it sit at room temperature for another 2–4 hours (depending on your kitchen’s warmth) until it has grown by about 50% and looks jiggly.
Step 4: Cold Fermentation
Place the covered bowl in the refrigerator for 12 to 18 hours. This cold ferment is crucial for developing those iconic sourdough bubbles and a deep flavor profile. The cold temperature slows down the yeast but allows the enzymes to work their magic on the flour’s starches.
Step 5: Pan Proofing
Generously coat a 9×13 inch metal baking pan with olive oil. Gently tip the cold dough into the pan. Do not force it to the corners yet. Flip the dough once so it is coated in oil. Cover the pan and let it rise in a warm spot for 2–4 hours. During this time, the dough will naturally spread to fill the pan and become very bubbly and airy.
Step 6: Dimpling and Baking
Preheat your oven to 425°F (220°C). Drizzle the top of the dough with more olive oil. Grease your fingers well. Press your fingertips straight down into the dough to create deep dimples, reaching all the way to the bottom of the pan. Watch as bubbles erupt around your fingers. Sprinkle with flaky sea salt and rosemary. Bake for 20–25 minutes until the top is deeply golden and the edges are crispy. Transfer to a wire rack immediately to keep the bottom crunchy.
Expert Tips for Perfect High Hydration Sourdough Focaccia Bubbles
To get the best results, always use a high-protein bread flour; all-purpose flour often lacks the strength to hold those massive bubbles. If your dough feels too sticky to handle, keep your hands wet with water rather than adding more flour. The “jiggle test” is your best friend—if you shake the pan and the dough moves like gelatin, it is ready for the oven. Finally, ensure your oven is fully preheated for at least 30 minutes to give the dough that initial burst of heat for maximum “oven spring.”
Delicious Variations
- Garlic and Herb: Press cloves of roasted garlic confit into the dimples before baking.
- Garden Focaccia: Decorate the top with cherry tomatoes, thinly sliced red onions, and bell peppers to create a floral landscape.
- Pesto Swirl: Dollop small amounts of basil pesto over the dough before dimpling to create green marbled pockets.
- Cheesy Jalapeño: Top with sliced jalapeños and a heavy dusting of parmesan cheese for a spicy, salty kick.
Frequently Asked Questions
Can I use sourdough discard instead of active starter?
For the best bubbles and rise, an active, bubbly starter is highly recommended. Discard may result in a flatter, denser bread with less fermentation activity.
Why didn’t my dough get big bubbles?
This usually happens if the dough is under-proofed or if the starter wasn’t active enough. Ensure the dough is very jiggly and has visibly doubled in the pan before you dimple it.
What is the best pan for focaccia?
A heavy-duty metal baking pan or a cast-iron skillet is best. Glass or ceramic pans do not conduct heat as efficiently, which can lead to a soggy bottom crust.
How do I store leftover focaccia?
Store it in an airtight container at room temperature for up to 2 days. To revive the crunch, toast it in a 350°F oven for 5 minutes.
Can I freeze the dough?
It is better to freeze the baked focaccia. Once cooled, wrap it tightly in plastic wrap and foil. Reheat directly from frozen in a hot oven until warmed through.
Conclusion
High Hydration Sourdough Focaccia Bubbles is more than just a side dish; it is a true baking achievement that celebrates the science of fermentation. The combination of a long cold ferment and high water content creates a texture that is both sophisticated and incredibly comforting. While it requires a bit of planning, the actual hands-on time is minimal, making it a perfect weekend project. Serve it alongside a bowl of pasta, use it for the best sandwiches of your life, or simply enjoy it warm with a drizzle of balsamic vinegar. Happy baking!